
Project explainer
A mechatronics rig for a client who needed to scan and scratch a large volume of gift cards automatically — custom PCB, 3D-printed enclosure, Raspberry Pi, computer vision, and motor control.

What it is
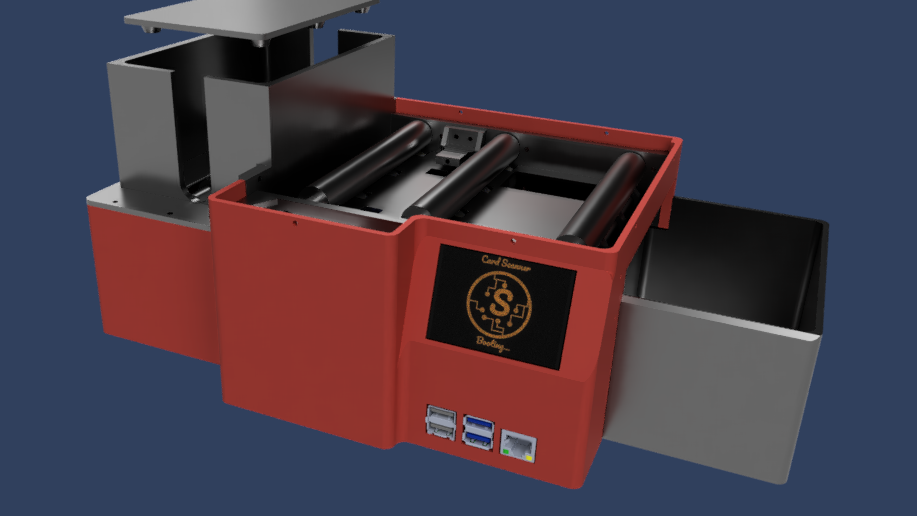
The client had a gift-card processing workflow that required scratching off a security layer to reveal a code, then scanning and logging that code to a spreadsheet. Done manually it was slow and error-prone. I designed and built a bench-top rig that handles the mechanical sequence — feed, scratch, scan, eject — under Raspberry Pi control with a custom PCB handling the motor drivers and sensor inputs.
Components
The pieces fit together as a single mechatronics stack: compute at the top, custom hardware in the middle, mechanics around the outside, vision on the input, and software on the surface.
- Raspberry Pi — ran the system state machine, the operator UI on the TFT touchscreen, and the card tracking log
- Custom PCB — motor driver stage, sensor conditioning, and power distribution, all on a board I designed and had fabbed
- 3D Printed Enclosure — I designed the housing to hold the card path, motor mounts, and display bezel; printed and assembled it to check fit before the final run
- Computer Vision for OCR — used a USB camera and Tesseract running on the Pi to capture and parse the scratched code; tuned the lighting and camera angle until the recognition rate was consistent
- Motor and Positioning Control — wrote the closed-loop stepper sequencing in Python to handle the scratch mechanism, card advance, and eject sequence with positional accuracy

How it works
- Card Input — the hopper feeds a card into the machine under stepper control
- Surface Scratching — a spring-loaded scratch bar presses down and scrapes the security coating off the code area
- OCR and Text Extraction — the USB camera captures the exposed code, and Tesseract on the Pi extracts the text and appends it to the log
- Data Storage — each card’s code and timestamp gets written to a CSV on the Pi’s SD card
- Card Ejection — the stepper advances the card to the output slot and the next card drops in
Interface
I wrote a Python UI on the Pi’s TFT touchscreen — card count, current state, error indicator, and a manual override button. The client could run a batch and walk away; the log file had everything they needed for their records.
Outcome
The rig processed a full batch of cards at the client’s site, logged every code correctly, and handed off without any back-and-forth on the firmware. The client used it for the remainder of their rollout.